How to setup Table of Content in Webflow
This article guides you through automating a table of contents (TOC) using heading components with unique classes and IDs. It covers creating a responsive TOC structure, linking entries to headings with JavaScript, and hiding unmatched chapters. The setup supports both desktop and mobile views, ensuring automatic updates and consistent navigation.
Automatically update headings, hide empty chapters, and support multiple responsive TOCs.
The working idea behind the table of contents is as follows: you have components for each heading level, and inside each component is the corresponding heading text with the corresponding CSS class. For example, inside an H2 heading component, there is a single H2 text element with the class .heading-style-h2. In our situation, you then give these components a "chapter ID" property, which is simply the linked to the regular HTML id property.
In the table of contents itself, you set up your structure by deciding how many primary headings and how many secondary headings you want as a maximum. In our case, I went with 5 primary chapters, each with 4 children. The idea is that this is the maximum, meaning no article can have more than 5 primary and 20 secondary headings linked. This doesn't mean an article itself can't have more than this number of headings, but you can only link 5 primary headings and 20 secondary headings within it.
Once this is set up, you link each chapter in the table of contents to an id by default. So, when 1.1 in your structure is clicked, it will always jump to whatever element has an id of 1.1. The 3.0 table of contents element will always jump to whatever on-page element has an id of 3, and 3.4 will always jump to whatever element has an id of 3.4, and so on. You get the drift.
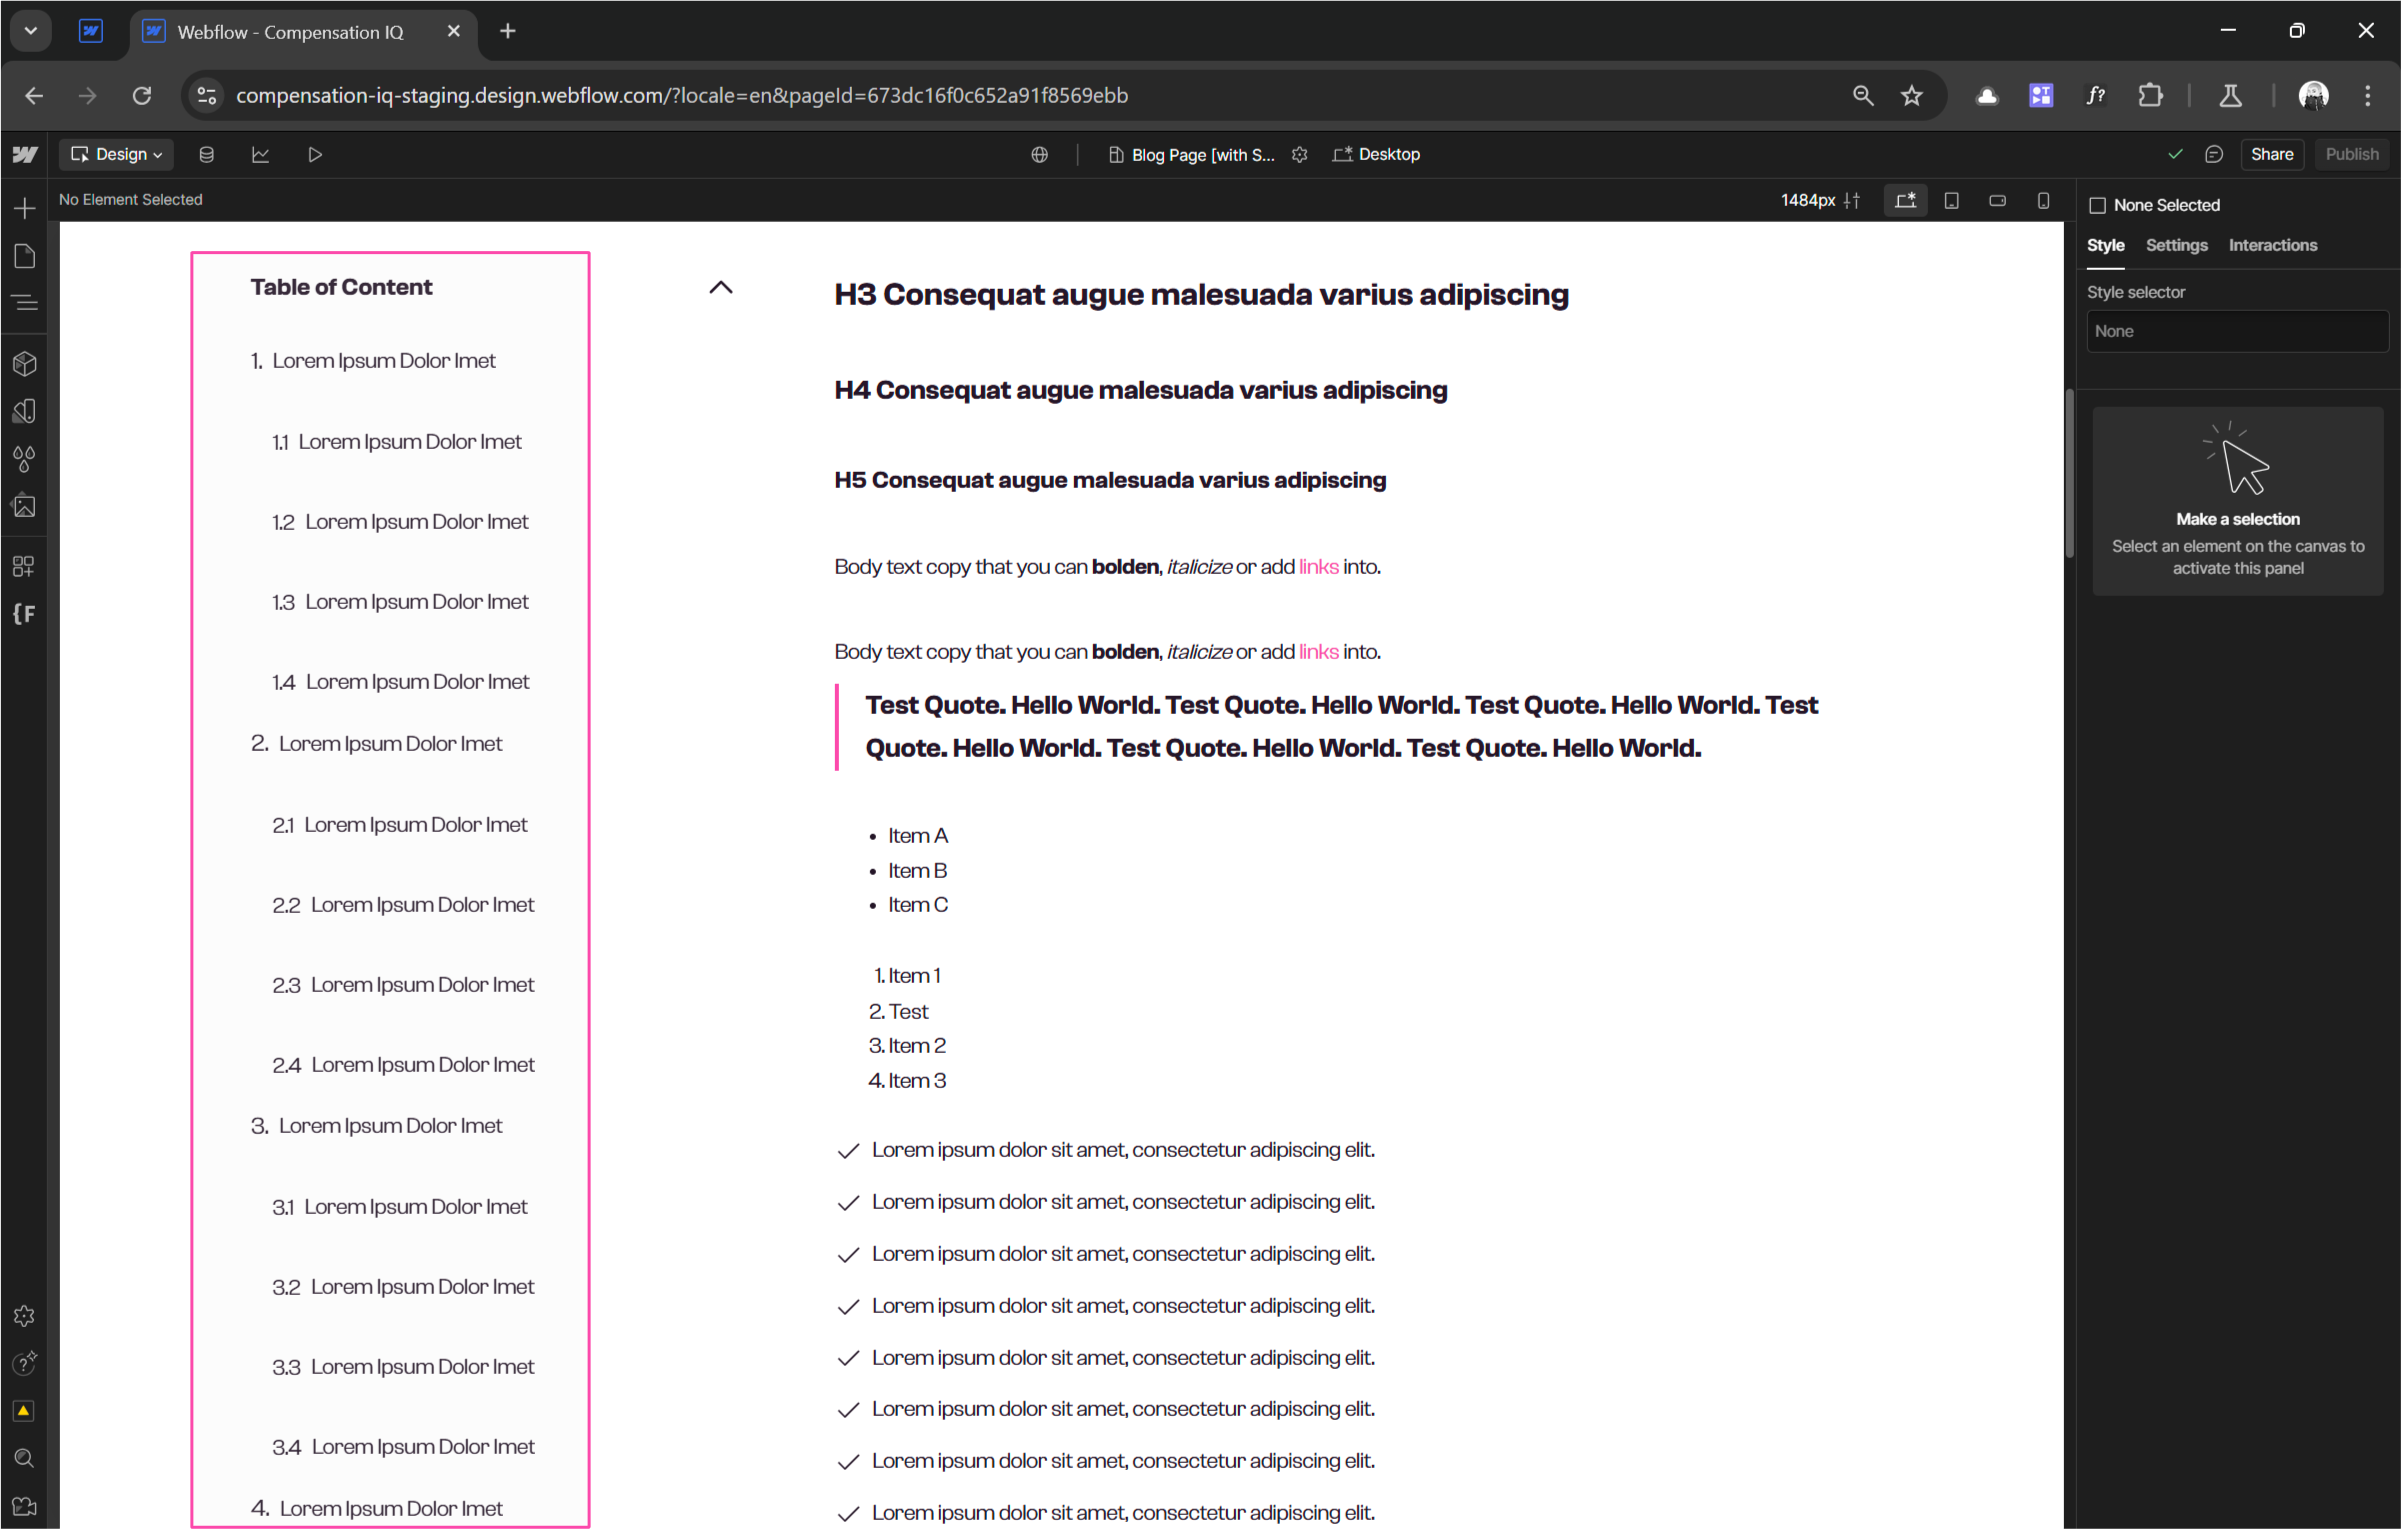
Conversely, any table of content chapter that doesn't get linked to from a header component, gets automatically hidden by the custom code below. As you can see in the image below, some sub-chapters are missing because the are no such chapters in the blogpost. This also applies to the primary chapters e.g. 2. , 3. etc

Now, where it all comes together is that you remember those header components you created earlier and gave component properties to their ids? Once you drag in any of the heading levels, fill it with text, and then assign it the chapter id you want, for example, 4.4, then by the power of the custom code below, the text you filled into that component is copied into the 4.4 chapter link in the table of contents. The 4.4 chapter table of contents link is now automatically linked to jump to that heading element you just brought in when it is clicked.This is the explanation of how this table of contents system works. Below, I will walk you through the setup step by step.
Step 1: Prepare Your Heading components
For each section heading (for example, H2-H5) that you want in your table of contents, create well-named classes and assign them to the text element in the relevant components. For example, I have an H2 component, an H3 component, etc.
In our case we always use Finsweet's client-first naming conventions and system.
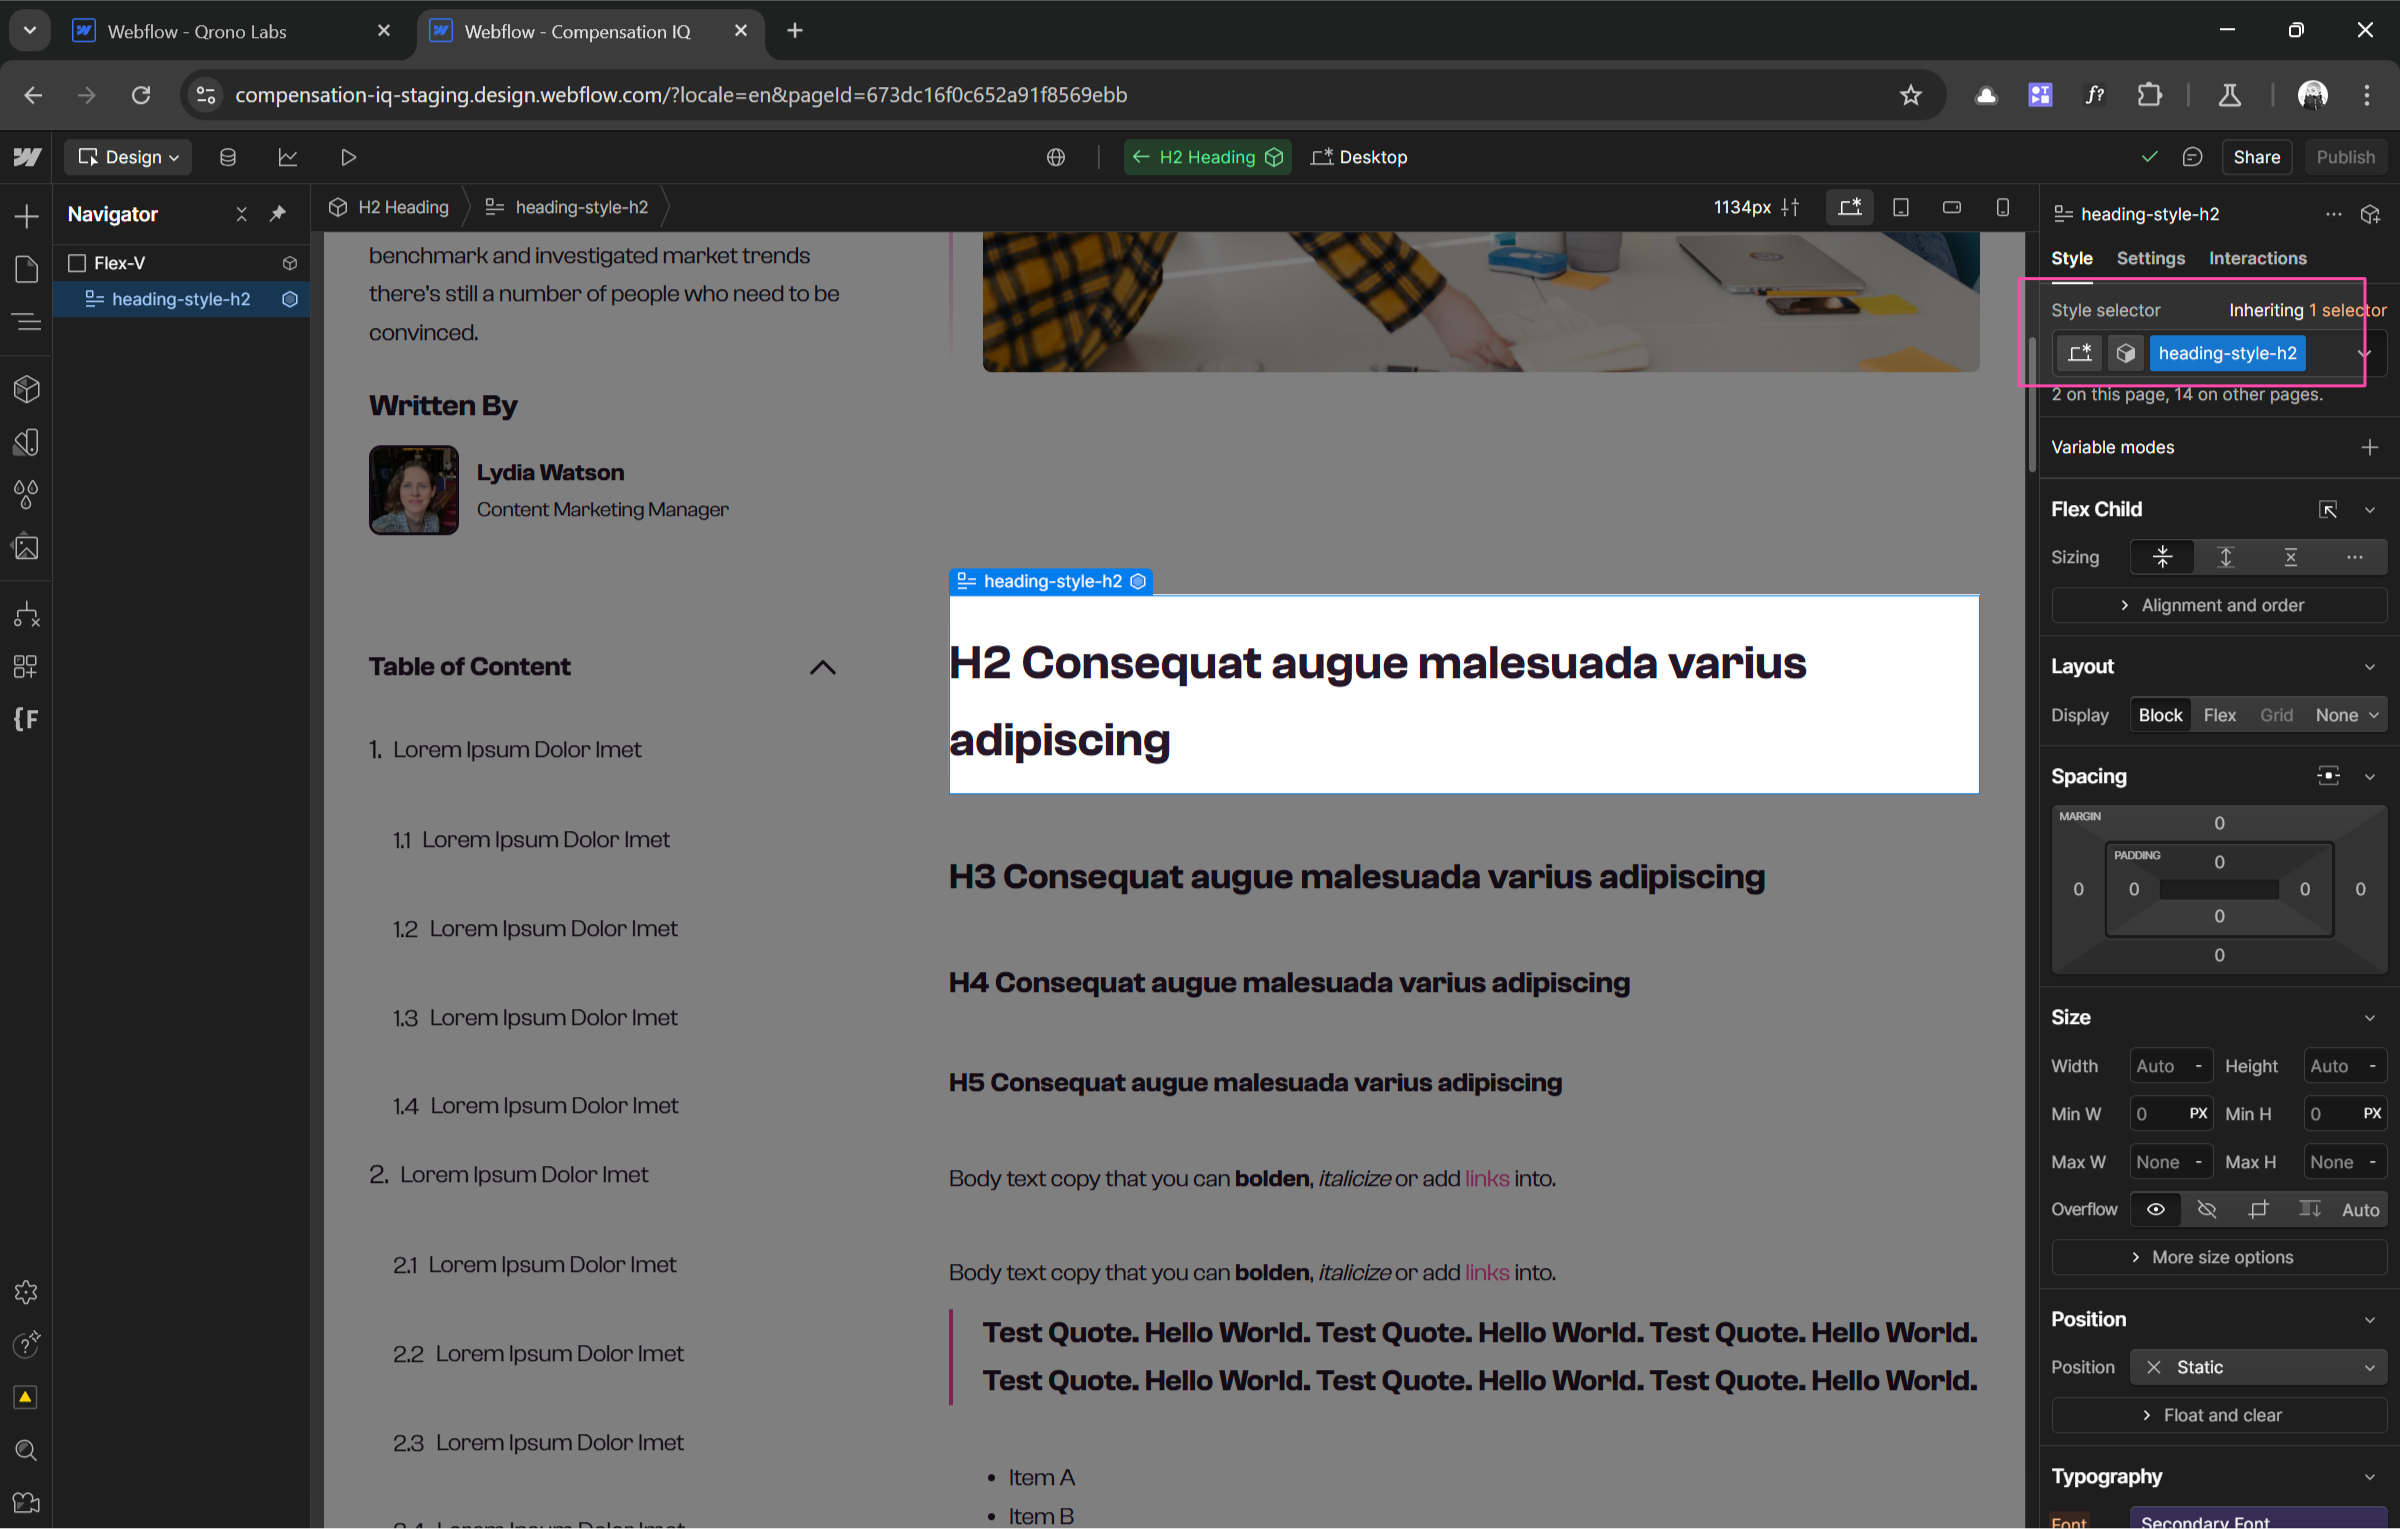
Then, attach a component property to the ID property of the text within this heading component.
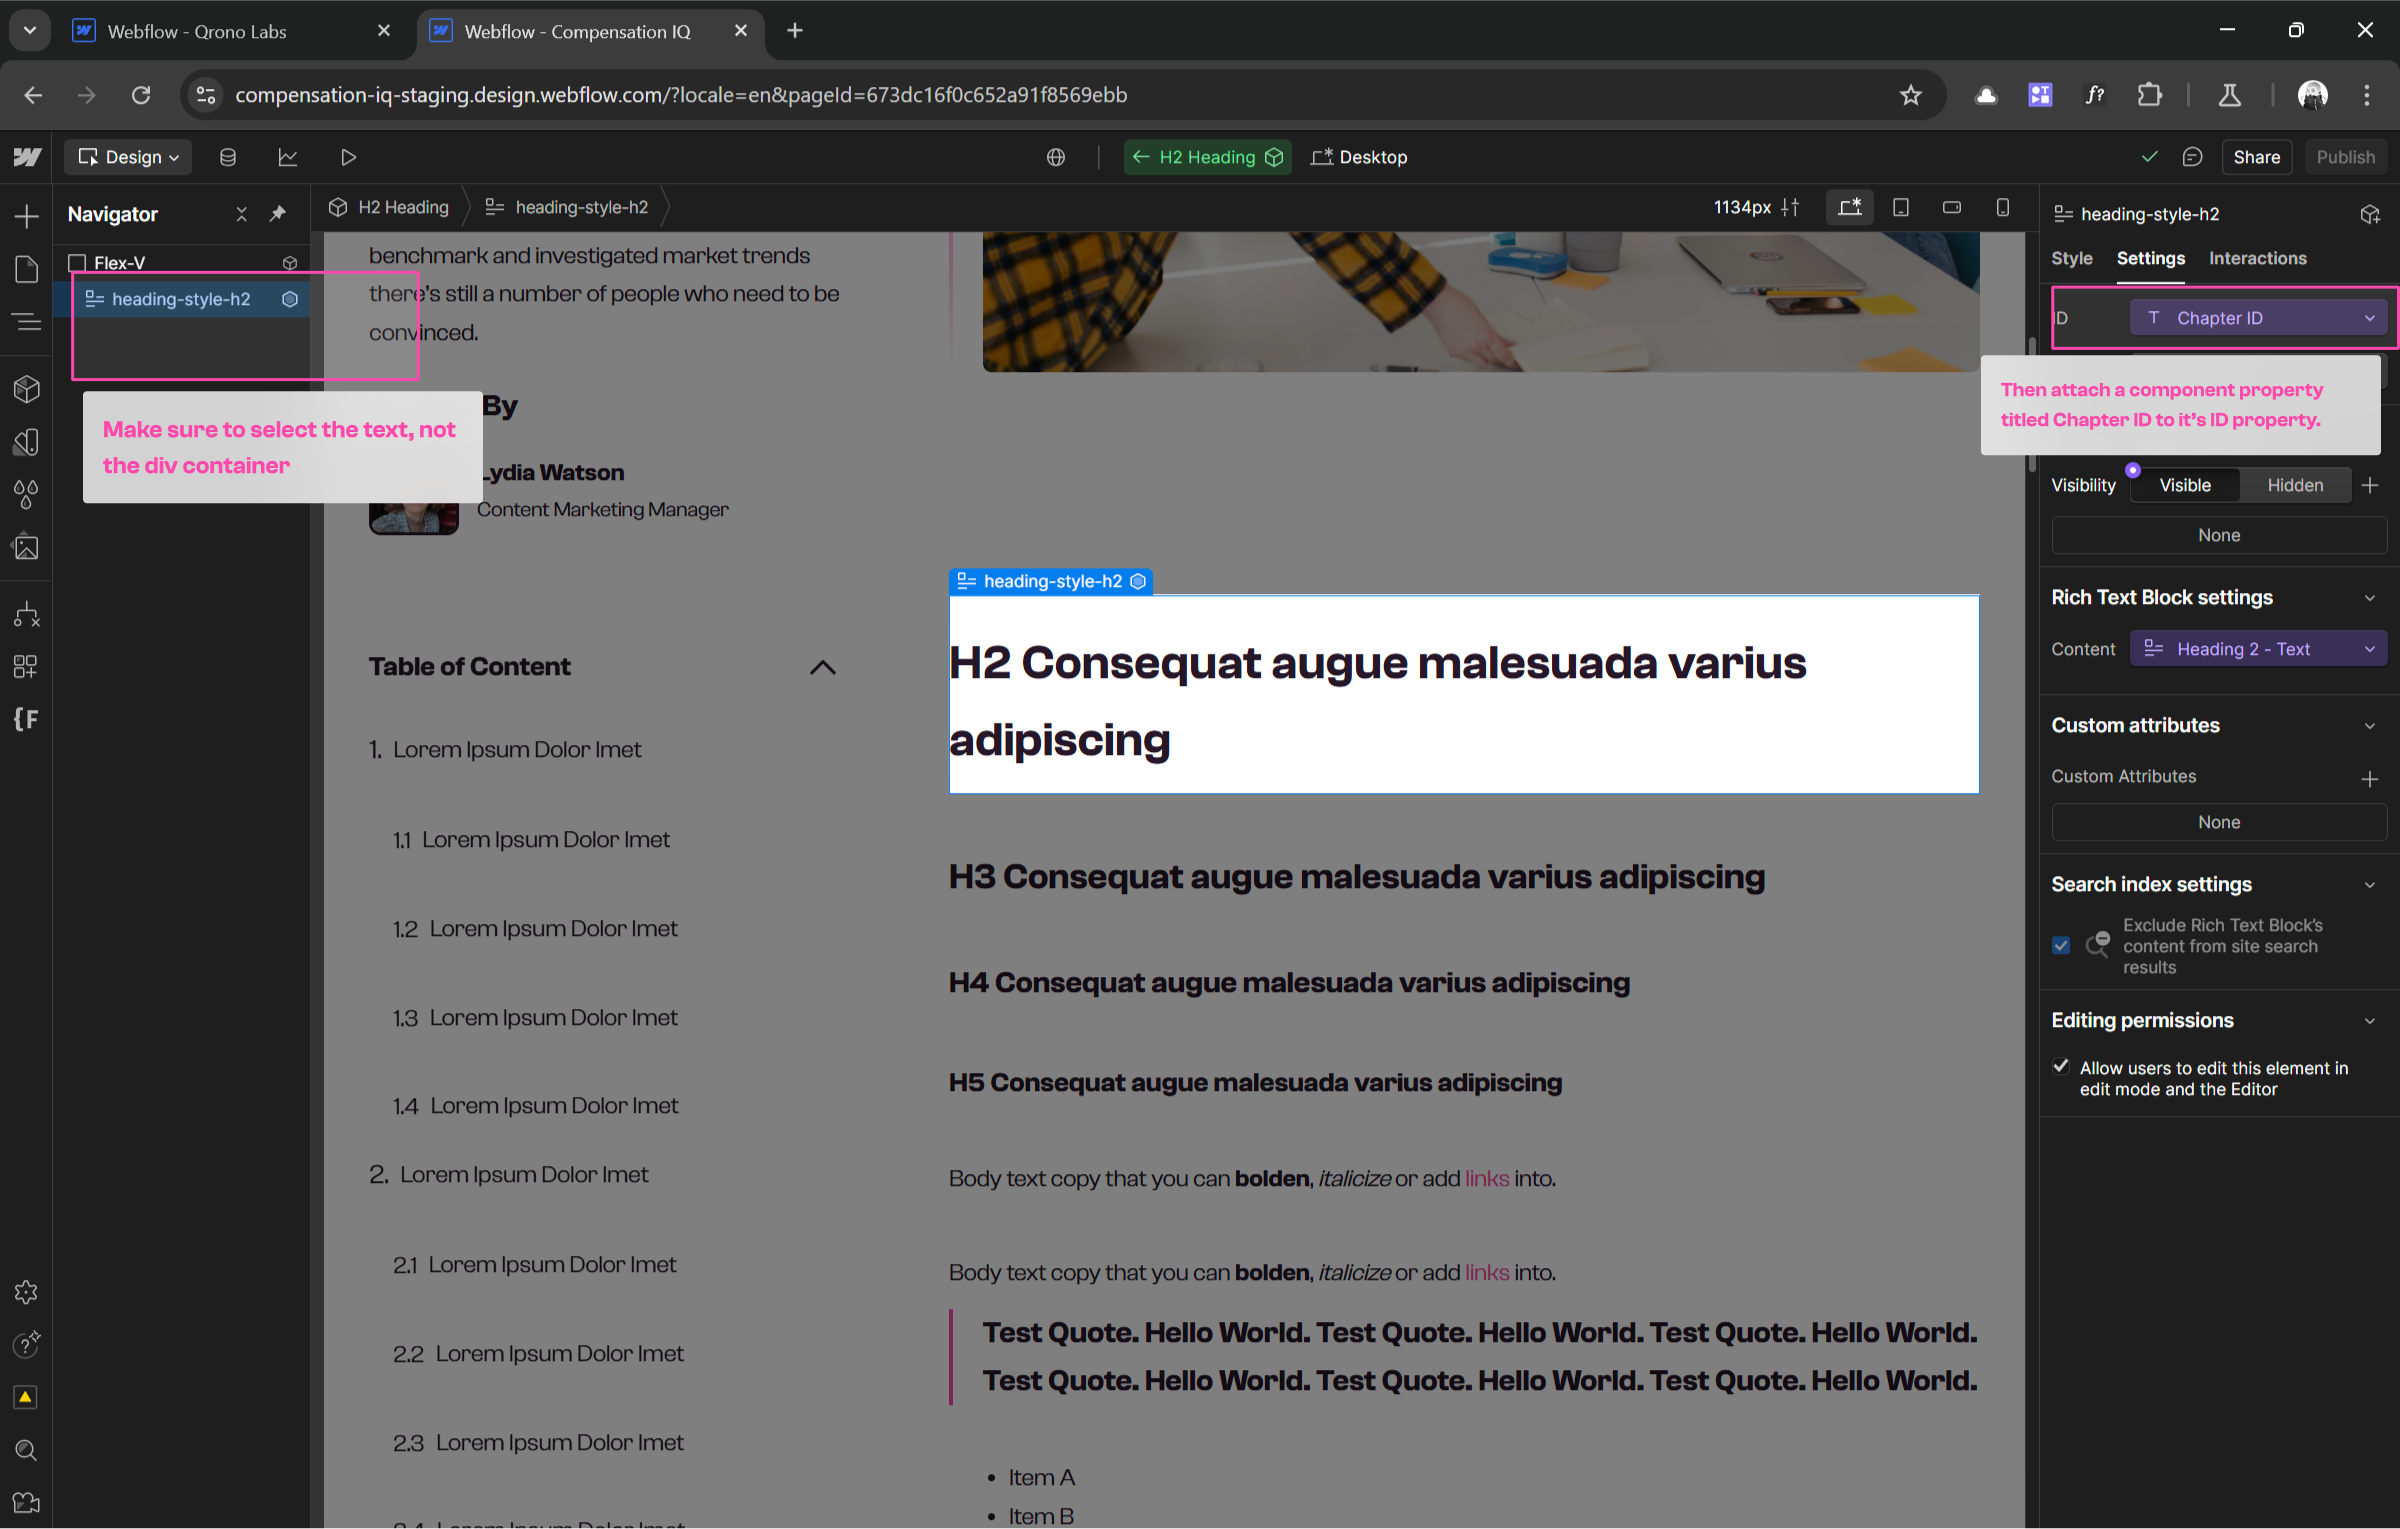
This is so that when users are building their blogposts and drag in a heading element they can easily assign unique chapter IDs like 1.1, or 2.3 to correspond with the position in the table of content they want that heading to appear.

Step 2: Create the Table of Contents (TOC)
- Add a parent div with the class
toc-container(repeat for desktop/mobile TOCs). This is the div that will wrap the entire table of contents. - Inside it, create
toc_chapter-divdivs for each table of content entry e.g.1. Lorem Ipsum, and this is the same div that will hold1.2 Ipsum Secondary Title. This div will wrap each chapter. - Inside each chapter div [
toc_chapter-div]:Add a link element with the classtoc_text. Set itshrefattribute to match a heading ID (e.g.,#1.1) corresponding to the chapter you want that text in the table of contents to jump to.
Step 3: Add the JavaScript
- In Webflow’s Project Settings > Custom Code:Paste this code in the Before </body> Tag.
1<script>
2document.addEventListener("DOMContentLoaded", () => {
3    // Function to update visibility and content for a specific TOC container
4    const updateTOC = (tocContainer) => {
5        // Hide chapters without matching headings
6        tocContainer.querySelectorAll('.toc_chapter-div').forEach(chapterDiv => {
7            const tocText = chapterDiv.querySelector('.toc_text');
8            if (!tocText) {
9                chapterDiv.style.display = 'none';
10                return;
11            }
12
13            const href = tocText.getAttribute('href');
14            const targetId = href ? href.slice(1) : null;
15
16            const headingExists = targetId && document.querySelector(
17                `.heading-style-h2#${CSS.escape(targetId)},
18                 .heading-style-h3#${CSS.escape(targetId)},
19                 .heading-style-h4#${CSS.escape(targetId)},
20                 .heading-style-h5#${CSS.escape(targetId)}`
21            );
22
23            chapterDiv.style.display = headingExists ? '' : 'none';
24        });
25
26        // Update text content from headings
27        document.querySelectorAll(".heading-style-h2, .heading-style-h3, .heading-style-h4, .heading-style-h5").forEach(el => {
28            tocContainer.querySelectorAll(`.toc_text[href='#${CSS.escape(el.id)}']`).forEach(tocText => {
29                tocText.textContent = el.textContent;
30            });
31        });
32    };
33
34    // Update both TOC instances
35    document.querySelectorAll('.toc-container').forEach(updateTOC); // Add a common class to both TOC containers
36});
37</script>
Step 4: Test & Publish
- Preview your site:
- TOC entries will auto-populate with heading text.
- Chapters without matching headings stay hidden.
- Desktop/mobile TOCs update independently.
Step 5: Mobile Table of Content
I also built an alt table of content to show up on mobile since you can't have a sidebar on mobile, but it's the same exact working principles and strcture just that now the table of content is hidden in a popup that only shows up on click.
Why This Works
- Dynamic Text: The script copies text from headings to the table of content's links automatically.
- ID Matching: Only shows TOC entries where heading IDs match
hrefvalues. - Responsive: Uses Webflow’s native visibility controls for device-specific TOCs.
This setup eliminates manual TOC updates and ensures consistency across devices. For a live example, see my Webflow demo project here.
Integrating this into a blog
If you want to learn more than just the table of contents and also learn how to build a fully composable blog in Webflow that you or your clients will love, check out this other article: How To Build a Fully Composable Blog Using Webflow.
If you have questions about any part of this article, you can reach me on daniel@qronolabs.com


.avif)
.png)
6.png)